Friday 15 March 2013

HOW TO CREATE A MUSIC VIDEO

Weather you want to create a music video for fun or for a local band, these are some tips that well help make things go smooth.

If you are just starting out in film making and your equipment may not be much, I would recommend creating music videos instead of films simple because you don't have to worry about audio. The audio from the camera is muted in your final video you will be hearing the actual music track.- This is all done in editing later. Once you understand the process of editing you can move into film making. I feel this is a great way to get familiar with the editing program.

Before you start filming your music video you may want to brainstorm on how you want the video to look. I usually remake a video the way I see it. It may not always look like most people expect, they usually turn out pretty crazy. 

For the most part I film 3 separate scenes and then later blend them together in editing.

For example (see below)


There are 3 scene in this video. So I have 3 video tracks and a music track in my time line in Sony Vegas Pro.

Once you have your scenes planned, you basically film your actor lip singing to the actual track, like I mentioned before it doesn't matter how it sounds since you won't hear this in the finish product. (see below time line screen shot)


So in this case we have 3 scenes and I have muted the tracks. The point of having the music playing when you are filming is so that later in editing you can hear the song and sync it up with the actual music track. plus the music playing  on set helps the actor know when to move their lips. 

If you aren't familiar with the time line  the track that is on top plays firsts. (see below)


when you start adding your videos into Sony Vegas import one scene at a time and the actual music track. Line up the video to the song by moving the video to the left or right and previewing it until it sounds in sync. usually you can tell because the song has a echo when you play it back in preview.

 once its in sync you can muted your track. 

then import the next one and so on. When you have imported your second video enter it above the first video so its shown first, so then you can see it when you are syncing it to the audio. 

Once all 3 of your scenes are in the time line and you have them muted you can begin editing it.  

Like I said whatever track is on top will be the only track that will show when you preview it. So what we need to do is cut parts of the first track out so the track below it will be shown.

See images to cut clip


  You can continue this until you have everything the way you want it. 


LESSON 13: DO YOU NEED BETTER QUALITY SOUND?

So you have created your film and you notice the quality of the audio isn't that great. 

What do you do? 


If the audio came straight from the camera your issue maybe that it is to low? or just sound bad? Of course when you are filming a dialogue scene and the actors are distances from the camera  the audio will be to low and will cause your videos to be unprofessional sounding. 


Unfortunately there isn't any way to fix videos that you already created but if you want to have better audio in your videos you are going to need a external recorder, Also known as a Field Recorder.  If you are looking for a cheap fix. I would recommend a product call Zoom H1 recorder. 


There have been newer products made from Zoom but this is the cheapest option for a indie film maker. 


Its about $99. and is very effective solution. It uses mini SD storage. 


TO USE:

You record your audio separate from your camera internal mic and later replace the camera track with your zoom H1 audio in editing. 

You can use the built in mic or you can plug in your own to the line in option.  its very simple to use. You just press the red button on the front to start your recording. Once you have recorded your clips and have transferred them to your computer you will need to import them into your editing program. 


Mute your original audio track that was recorded from your camera.


To get the audio to sync properly the best way would be to use a clapper when you record your video and audio.


When you are filming your video you use the clapper at the beginning of the video and later in editing when you see the clapper on the video you sync it to the clapping noise in your zoom audio file.  Once its lined up correctly, you can trim the beginning of your video. 


Some benefits when using the Zoom H1 is that you can put it on a boom pole and hold it close to your actors.   


The mic is very sensitive so you are also able to get sound effects that you can't with the internal mic on your camera.  if your using the headphones you can listen to the sound while your recording.. so later there are no surprises in editing. 


Thursday 14 March 2013

LESSON 12: VIDEO TEMPLATE

Did you want to add something extra to your videos??  A introduction screen?


Maybe add text and borders to the top and bottom of you video. 


You could use this if you want to put together a Demo Reel of your work
You can create this in photo shop and later add this to your video.

If you have photo shop you can create this template. If not you can download a free trial on the adobe website.

Open Photo shop - Go to FILE then New - 
Select the Film and Video template then choose DVCPRO HD 1080 - 
Then for background content  Choose Transparent


Change the colour of the brush to black


Click Paint Bucket Fill and click the box the change it to black


Select the Rectangular Marquee tool 

select where you want the video to show, then hit Delete. 


Then Select the Rectangle Tool


Draw a Square Around the area where you want to have the red squares, then double click the rectangle in the layer list on the right and change colour overlay to red (see below)


Then change the opacity to your layers to make them transparent.


Double click on your background layer and choose gradient overlay,


You can keep adding rectangle throughout your project. To make it interesting.  change the transparency and colour.


The text that was in my original background screen was added in Sony Vegas Pro. 

Once you have completed this you can save it as PNG and import it into your editing program. 


This the end result. Of course you can change the colours and layout depending on what you want to use it for. This one would properly be good for a corporate demo

Wednesday 13 March 2013

LESSON 11: WHAT CAMERA DO YOU USE?

When you first start out in film making you may not want to spend to much money on a camera.  I would recommend getting a camera that is at least 1080 HD.  If your like me when you see your video's end result the quality of the video may discourage you from pursuing film making any further.

When I first started I was using a JVC HD camcorder. When I bought it I thought the HD meant High Definition. Well I was wrong because what it really meant was that it had a built in Hard drive for storage. My first film was nothing special of course but the quality turned me away from film making for a bit.

Later I finally gave in and got myself a Canon Vixia HF200 camera. It cost quite a bit more than the JVC, At that time it was around $1000. Now you can get the same camera for about $600


This camera was great for starting out. I got many years of use and create a couple short films and many music videos.  The only problem with this camera was the fact that it wasn't great in low light and there wasn't any Shallow Depth of Field.  But overall a great HD camera.

Shallow Depth of Field is bascally the distance between the nearest and farthest objects in a scene that appear acceptably sharp in an image. In other words you can focus on one part of a scene and have the background out of focus.


                                     Canon Vixia was used in the below video

Later this year, I decided to give in and get a professional type camera. I am now using Canon 5D Mark 2 - This camera's takes amazing photos and video.  It cost quite a bit more than the first camera but definitely worth it.  

Another options these days if you don't want to spend to much on your camera. You could always use an iphone - The iphone takes decent video - This is a video to show you what an iPhone can do with the right added effects and used properly.  Note: this video is made by Matthew Pearce.  He used a tripod mount called GLIF


WHAT CAMERA DID YOU USE WHEN YOU STARTED OUT?? 


Tuesday 12 March 2013

LESSON 10: SPECIAL EFFECTS

So you want to create some amazing effects for your film and don't know where to start?  I great program that has a lot of support and tutorials online is called Adobe After Effects. If you are looking for effects for your movie intros or you want to create an explosion of some sort. This program can do it all.  Once again you can get a free trial here.  See below for a quick video that I created with Adobe after effects and some free music I found online.


For this video I used several plug ins to get this effect. Some that were included with After effects and Some that I downloaded. 

This text effect that was added came within After effects.
The bubble effect you see flying toward the camera is called Trapcode Particular - View product here

The lens flares is a product called Optical Flare from Video Copilot - You can see this and other products here

If you are looking for video tutorial I would recommend checking out Video Copilot as well - There are many step by step tutorial from beginner to advanced. This site is the best you will find online for After effects tutorials.

Another great option when you purchase Adobe Production Premium Suite.  There is a function called Dynamic Link,  it works between After effects and Adobe Premiere . Example, If you are doing your editing with your raw video files into Premiere,  you can choose to add your effects in After effect,  The changes will update in real time without having to save your video from one program and importing it into the other.  Dynamic link also works with the other Adobe production as well.

When you feel your ready for a more advanced editing software, I would recommend using Adobe Premiere as your editing software because of the Dynamic Link option

Next lesson will be Camera options. ...


LESSON 9: COLOUR GRADING

The previous lessons we were using Sony Vegas Pro for the editing but what if you want to add more to your scene for example:


Colour Grading
Special Effects

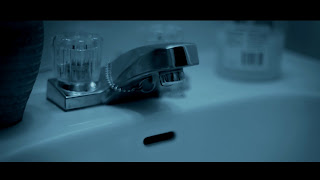
Colour grading is basically a mood that you want to give your film (See below images)


These images are from a short film project that I did. As you can see that the colour of the video gives the audience a cold, horror movie feel.
To create this sorta look, You can do it within the edit program.  The plug in I used for this is called "Magic Bullet Look". You can download the free trial here.  You can download the plug in for almost any video editing software. There is also a stand alone option that doesn't require a editing program. If you are using your iPhone or iPad to shoot video they even have a app. so you can add this look on your iOS device

You can of course do colour correcting in Sony Vegas Pro, But it will take a bit more work to get this look. I highly recommend this product. even with not such a great camera you can make your films look professional.

Next we lesson will be special effects


Monday 11 March 2013

LESSON 8: SCRIPT WRITING

If you followed the last lesson we talked about Planning a story, Once you have created your A Story you can begin to write it. Instead of using Word Processing software it would be best to use a script writing software because it gives you the correct format that a script should be written.   There are many different software, some cost and some are free.

One of the most popular is called Final draft this isn't a free program but you can download a demo verson at http://demo.finaldraft.com/download/  

A free program that is quite popular is called Celtx, https://www.celtx.com.

Once you have download your program you can begin to put your story together.

In this turorial I am using Final Draft.  When you open the program and create a new document. You will create a cover page.


If you don't know what your title will be at this point you can always add this later.

So now we will begin to writing the script.

on the right side of screen you will need to write type of transition for the scene, example : FADE IN: (see below)


When pressing ENTER. You will get options for the type of functon you are trying to perform.


Once you choose a option, Your cursor will go to the correct part of your page for the proper formatting.


Then you need to know is where your charactors is located for your scene heading,  SO for example you might see:  INT - HOSPITAL - NIGHT


INT MEANS - INTERNAL (meaning inside)- Scene location is HOSPITAL - SCENE IS AT NIGHT

If you see EXT - This means EXTERNAL -(Meaning outside)

Next we need to be discripitive of what you are seeing in the scene , Example:  A girl is laying on the bed crying. She is holding a picture of a girl. (see below)


Next you need to write your dialoge, It will look something like this.


Once you get to the end of the scene you will need to know what kind of cut you are making, (See below)


You will continue this format for each scene of your script.....

Next lesson we go over Colour Grading